How to Add a Picture to a Picture in 3 Easiest Ways

Deprecated: htmlspecialchars(): Passing null to parameter #1 ($string) of type string is deprecated in /home/techdai2/public_html/wp-includes/formatting.php on line 4650
Do you to share pictures on social media platforms like Instagram but feel your photos are not dazzling enough? In this case, you may want to know how to add a picture to a picture to generate creative and artistic effects. Superimposing images together is a prevalent image processing method. You can create a new transparent background for an image, combine multiple images together to create a double exposure effect, add a person to a photo, or fake a photo with your favorite star. Do you know how to superimpose images? This article shares three different ways to integrate pictures with free solutions included. Let’s break down the steps for each method!
Comparison of the Three Methods
| WorkinTool Image Converter | Photoshop | IMG2GO | |
| Pricing | Free | 7 days free, then
$27.62 /mo |
Free but $8.5/mo for the Premium plan |
| Running speed | Fast | Average | Average |
| Compatibility | Windows | Desktop and iPad | Online |
| Convenience | Easy to use | Skills needed | Easy to use |
| Features | Multiple | Multiple | Multiple |
How to Add a Picture to a Picture with WorkinTool Image Converter

If you are searching for a versatile and free solution to add a photo to another photo, this is the right place. WorkinTool Image Converter is a free Windows-based photo editor. You can batch convert images, compress images, edit pictures, overlay images, restore old photos, remove watermarks from photos, make portrait and item matting, make a picture collage, and so on using this software to create fantastic images in a few clicks.
We’ve tried many times and confirmed that this software is free from in-app purchases and annoying ads. To summarize, the clean interface, fast running speed, and lightweight design make this image editor very easy to use, which is in pace with the consistent style of the WorkinTool family.
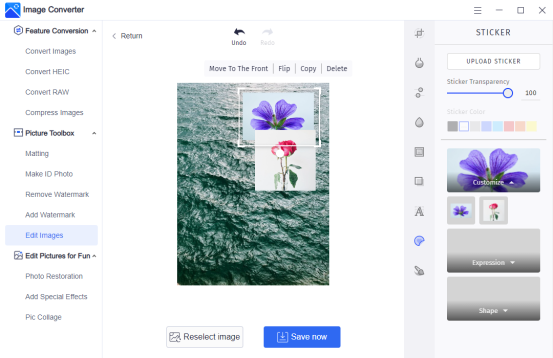
Here is how to put a picture on another picture using WorkinTool Image Converter.
- Upload a background image
Open WorkinTool Image Converter, click the Edit Images feature, and upload a picture. The picture you add will be the background picture.
- Insert photographs
Click on the Sticker button in the right toolbar. Then press the UPLOAD STICKER button to add a photo to a photo. You can add multiple pictures at a time. The images you uploaded will appear in the Customize section. Click pictures in that section, and they will show in the background.
- Adjust the picture and save it
After adding pictures to the background image, you can adjust the sticker transparency to create double exposure effects, make a copy of the picture you added, flip the sticker horizontally, rotate stickers, and move one sticker to the front. You can also adjust the integrated image by cropping, drawing, adjusting parameters, and adding filters, text, and frames. When all the work is done, save the image to your PC.
Read Also: The Top 5 Most In-Demand Careers Of The Future
Bonus Tips

The method above suits for simply integrating two images. To add a person to a photo or fake a selfie with someone, you need to cut out images. WorkinTool built-in Matting feature in the Picture Toolbox menu allows you to do portrait and item matting with no hassle. Both batch matting and single picture matting are supported. You just need to upload a picture, and it will be automatically recognized and cut out. Then you can select a background color, use the stock background template, or customize a background from your albums.
How to Insert an Image into Another Image using Photoshop

Similar to WorkinTool Image Converter, Photoshop is another picture editor that can be used for picture overlaying. I believe it’s needless to say how popular and influential this software is. It is applicable in Windows and Mac at the same time. One thing that sets this photo editor apart from other similar offerings is that it can handle different layers separately when adding a picture to a picture. That is to say, it allows you to edit, colorize, adjust the blending mode, effects, filters, and so on without influencing the other.
Here is how to add a picture to a picture in Photoshop.
- Open a background image in Photoshop
You can directly drag an image from your computer to Photoshop or click on File to open a new image. After that, you can click and drag the handles around the image edges to resize it.
- Drag and drop an image or multiple images to the document
Each image you add will become a separate layer. You can drag a layer up and down to move an image in front of or behind another image in the Layers panel.
- Fine-tune your image and save it
Select to edit different layers separately in the Layers panel. Whether to resize or reposition the images is at your disposal. After editing, save it to your PC.
How to Add a Photo to Another Photo Online
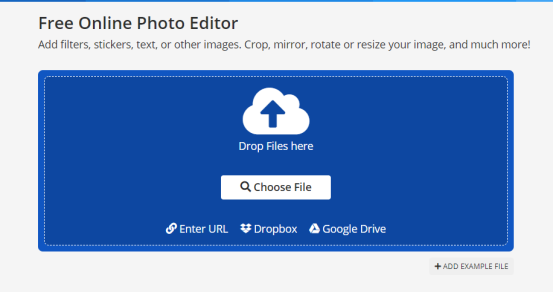
Some users want to put a picture in a picture for fun. In this case, you don’t need to download a third-party tool for single use. Whether you are using a Windows or Mac system or looking for solutions to add a photo to a photo on iPhone or Android, you can do that with IMG2GO, which is a free online photo editor that can add other images, stickers, and filters to a picture. It also supports cropping, mirroring, rotating, and resizing your images.
Here is how to add a picture to a picture using IMG2GO.
- Upload a background image
Head to IMG2GO first and upload an image. It may take a while to upload pictures. Please wait patiently.
- Add more pictures
Select ADD in the top toolbar to add more pictures. You can add one picture at a time from your local folder, Dropbox, and Google Drive or enter a picture URL with ease.
- Edit and download the image
After adding the rest of the images, you can easily customize the color, shadow, outline, background, texture, opacity, and gradient. It also allows you to flip a pic horizontally and duplicate a picture. Before saving the image, you can adjust its target format, quality, file name, and DPI together.
The Bottom Line
We’ve elaborated three easy ways to superimpose pictures. Both free and paid solutions are provided. I hope this article is intuitive. If you already know how to add a picture to a picture, pick one to edit your pictures. I believe you can create dazzling pictures after reading this post!
Deprecated: htmlspecialchars(): Passing null to parameter #1 ($string) of type string is deprecated in /home/techdai2/public_html/wp-includes/formatting.php on line 4650



![Fixing the PII [pii_email_bc0906f15818797f9ace] Error Code](https://techdailymagazines.com/wp-content/uploads/2021/10/Fixing-the-PII-pii_email_bc0906f15818797f9ace-Error-Code-390x220.jpg)